Infrastructure as a Code in AWS


In this article I will discuss how a simplified, yet functional network, server and storage infrastructure can be implemented as Infrastructure as a Code (IaC) using Amazon Web Services (AWS).
Outline:
What is IaC ?
It is the process of automating infrastructure management and provisioning using code. Some of the benefits of IaC are:
- Ability to version control infrastructure management's source code.
- Ease of resource creation and replication as the result of high level of automation.
- Lessens the time needed to manage and provision resources.
- Enables consistent development environment among team members.
Infrastructure design
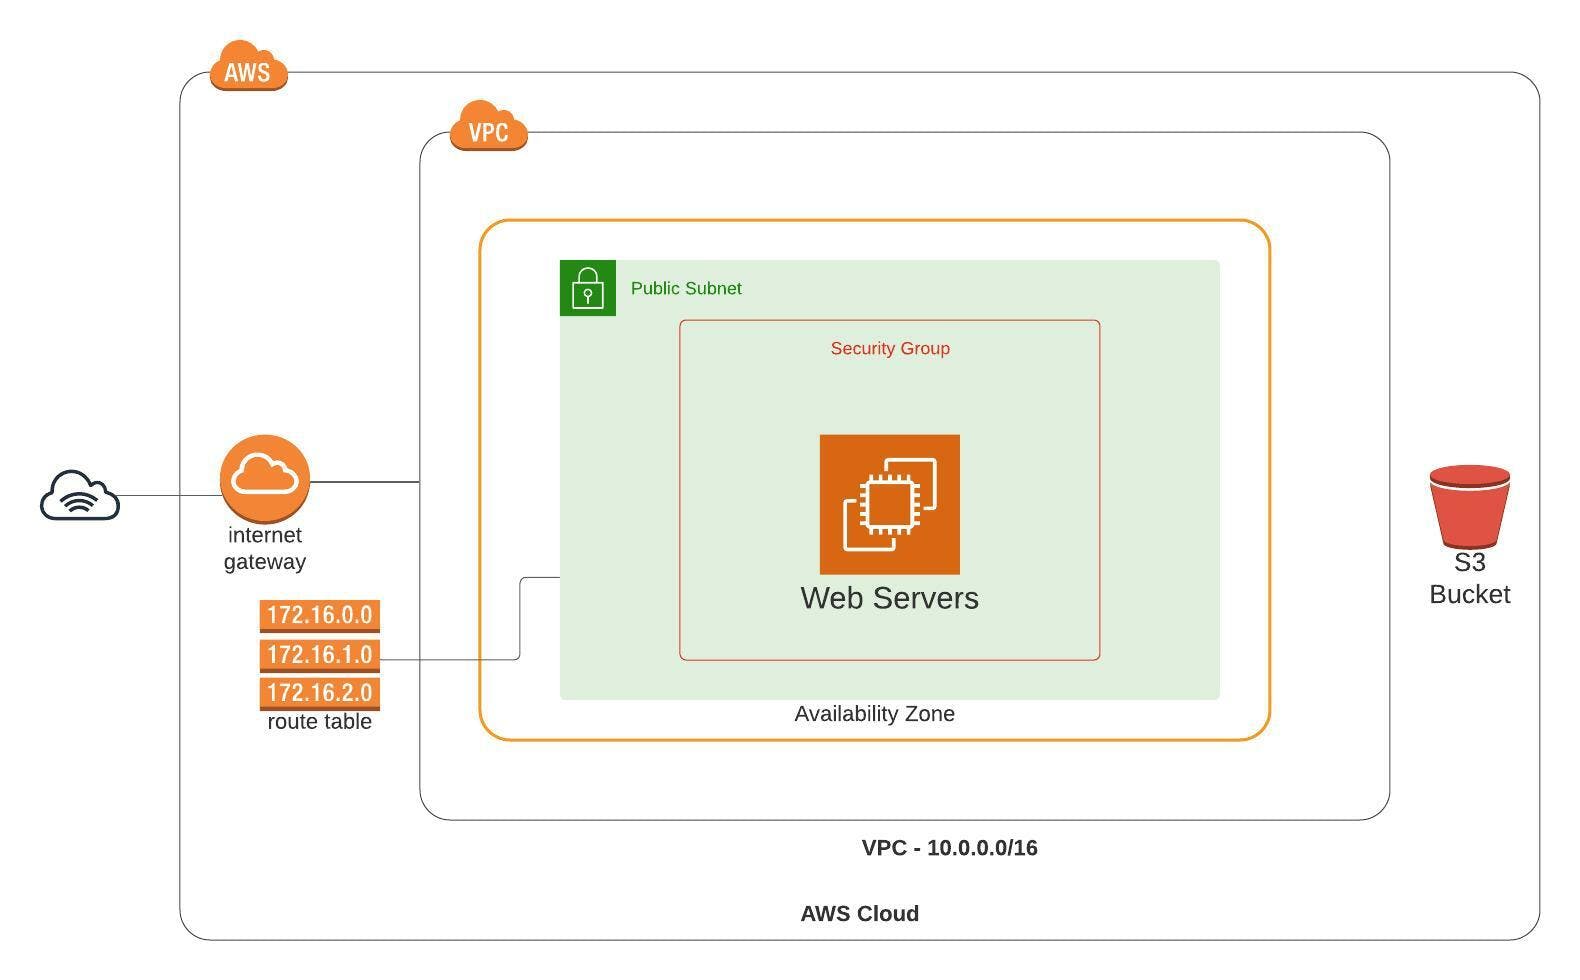
The infrastructure that we are going to use as an example for this article, is comprised of Amazon Cloud Storage Service (S3), a Virtual Private Network (VPC), an internet gateway, a public subnet, a route table, a security group and an Elastic Compute Cloud (EC2) server. Below is the corresponding architecture diagram.
Architecture Diagram
Amazon Web Services
Amazon S3
Amazon S3 is a cloud storage service. We will use it to store the contents of a demo web site. Which we are going to download later to a web server (EC2 instance).
To upload files to S3, we first need to install and configure AWS CLI. It is a command line tool that provides access to Amazon services from a local computer. Install and configure AWS CLI
Once the AWS CLI tool is ready for use, we can issue the S3 commands like so:
# create S3 bucket
aws s3 mb s3://[bezu-bucket]
# output
make_bucket: bezu-bucket
# upload index.html to the bucket
aws s3 cp [path_to_index.html]  s3://[bezu-bucket]/index.html
# output
upload: ./index.html to s3://bezu-bucket/index.html
# check the uploaded file
aws s3 ls s3://[bezu-bucket]
#output
[timestamp] [size] index.html
AWS Cloudformation
AWS Cloudformation is a service that handles the provisioning and configuration of our infrastructure resources based on a template.
Cloudformation Template
The template is a JSON or YAML text file describing the resources we would like to have. These resources are depicted in the architecture diagram above. Based on that, we define parameters, network and server related resources.
Parameters
Parameters are a list of user inputs that we can use to customize the template. They are defined in the Parameters section. Below we define three of them: AppName, VpcCIDR and PublicSubnetCIDR. CIDR stands for Classless-inter-domain -routing.
Parameters:
  AppName:
    Description: The name of the app
    Type: String
    Default: MyWebApp
  VpcCIDR:
    Description: CIDR IP range for the VPC
    Type: String
    Default: 10.0.0.0/16
  PublicSubnetCIDR:
      Description: CIDR IP range for the public subnet
      Type: String
      Default: 10.0.0.0/24
Resources
Under the Resources section of the template. We define a Virtual Private Network (VPC), an internet gateway, a public subnet, a route table, security groups, auto-scaling group and EC2 instance(s).
Resources:
  VPC:
    Type: AWS::EC2::VPC
    Properties:
      CidrBlock: !Ref VpcCIDR
      EnableDnsHostnames: true
      Tags:
        - Key: Name
          Value: !Ref AppName
  InternetGateway:
    Type: AWS::EC2::InternetGateway
    Properties:
      Tags:
        - Key: Name
          Value: !Ref AppName
  InternetGatewayAttachment:
    Type: AWS::EC2::VPCGatewayAttachment
    Properties:
      InternetGatewayId: !Ref InternetGateway
      VpcId: !Ref VPC
  PublicSubnet:
    Type: AWS::EC2::Subnet
    Properties:
      VpcId: !Ref VPC
      AvailabilityZone: !Select [ 0, !GetAZs '' ]
      CidrBlock: !Ref PublicSubnetCIDR
      MapPublicIpOnLaunch: true
      Tags:
        - Key: Name
          Value: !Sub ${AppName} Public Subnet
  PublicRouteTable:
    Type: AWS::EC2::RouteTable
    Properties:
        VpcId: !Ref VPC
        Tags:
            - Key: Name
              Value: !Sub ${AppName} Public Routes
  DefaultPublicRoute:
    Type: AWS::EC2::Route
    DependsOn: InternetGatewayAttachment
    Properties:
        RouteTableId: !Ref PublicRouteTable
        DestinationCidrBlock: 0.0.0.0/0
        GatewayId: !Ref InternetGateway
  PublicSubnetRouteTableAssociation:
    Type: AWS::EC2::SubnetRouteTableAssociation
    Properties:
        RouteTableId: !Ref PublicRouteTable
        SubnetId: !Ref PublicSubnet
The above snippet defines the following resources:
- A VPC with an internet gateway
- A routing table with a route to the internet (0.0.0.0/0) though the internet gateway.
- A subnet with a custom route table.
We continue defining the resources by adding a read only role on the S3 storage service and an instance profile that can assume this role. This enables the EC2 instance to download (read) the website files from the S3 storage.
S3ReadOnlyRole:
    Type: AWS::IAM::Role
    Properties:
      ManagedPolicyArns:
        - "arn:aws:iam::aws:policy/AmazonS3ReadOnlyAccess"
      AssumeRolePolicyDocument:
        Version: "2012-10-17"
        Statement:
          - Effect: "Allow"
            Principal:
              Service:
                - "ec2.amazonaws.com"
            Action:
              - "sts:AssumeRole"
      Path: "/"
  S3ReadOnlyProfile:
    Type: AWS::IAM::InstanceProfile
    Properties:
      Path: "/"
      Roles:
        - !Ref S3ReadOnlyRole
S3ReadOnlyRole : a Role having a policy that grants permissions that allow read-only access to Amazon S3.
S3ReadOnlyProfile : an instance profile that can assume the S3ReadOnlyRole. Instance profiles are use to pass an IAM role to the EC2 instance.
Next, we define a security group that allows incoming http requests on port 80 and allows all outgoing traffic (port range: 0 - 65535) to any destination (0.0.0.0/0).
  WebServerSecGroup:
    Type: AWS::EC2::SecurityGroup
    Properties:
      GroupDescription: Allow incoming http request to our host and outgoing traffic to any destination
      VpcId: !Ref VPC
      SecurityGroupIngress:
      - IpProtocol: tcp
        FromPort: 80
        ToPort: 80
        CidrIp: 0.0.0.0/0
      SecurityGroupEgress:
      - IpProtocol: tcp
        FromPort: 0
        ToPort: 65535
        CidrIp: 0.0.0.0/0
And then, we define the EC2 instance using a launch configuration. The launch configuration specifies the type of machine (e.g. t2.micro, ubuntu 20.4), the instance profile, security group, storage disk size and a user data. In the user data properties, we provide a script that will :
- Update the package's source list
- Install nginx web server and AWS CLI
- Copy the web site file from the S3 bucket to /var/www/html/ on the web server
- And restart nginx service
  WebAppLaunchConfig:
    Type: AWS::AutoScaling::LaunchConfiguration
    Properties:
      ImageId: ami-083654bd07b5da81d
      IamInstanceProfile: !Ref S3ReadOnlyProfile
      SecurityGroups:
        - Ref: WebServerSecGroup
      InstanceType: t2.micro
      BlockDeviceMappings:
        - DeviceName: "/dev/sda1"
          Ebs:
            VolumeSize: '8'
      UserData: !Base64 |
          #!/bin/bash
          apt update -y
          apt install -y awscli nginx
          aws s3 cp s3://bezu-bucket/html/ /var/www/html/ --recursive
          systemctl restart nginx
Finally, we add an auto-scaling group. The auto-scaling group monitors the application and automatically adjusts the capacity accordingly. As an example, we set the minimum number of EC2 instance to 1 and maximum to 2.
  WebAppAutoScalingGroup:
    Type: AWS::AutoScaling::AutoScalingGroup
    Properties:
      VPCZoneIdentifier:
        - !Ref PublicSubnet
      LaunchConfigurationName:
        Ref: WebAppLaunchConfig
      MinSize: '1'
      MaxSize: '2'
      Tags:
        - Key: Name
          Value: !Sub ${AppName}
          PropagateAtLaunch: true
That is it!! The full template code can be found here
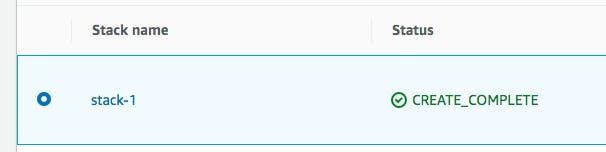
Now, let us make use of the cloudformation template and create the resources. The way to do that is by creating what is called a stack. A stack is a collection of AWS resources that we can manage as a single unit.
We use the AWS CLI tool to create, update and delete stacks.
Cloudformation Stack
To create a stack, we use the create-stack AWS CLI command on the terminal.
aws cloudformation create-stack \
    --stack-name stack-1 \
    --template-body file://[cf-template.yaml] \
    --capabilities "CAPABILITY_IAM" \
    --region=[us-east-1]
To update a stack, we use the update-stack AWS CLI command on the terminal.
aws cloudformation update-stack \
    --stack-name stack-1 \
    --template-body file://[cf-template.yaml] \
    --capabilities "CAPABILITY_IAM" \
    --region=[us-east-1]
Check the status fo the stack in AWS console: Cloudformation > stacks. It should look something like this:
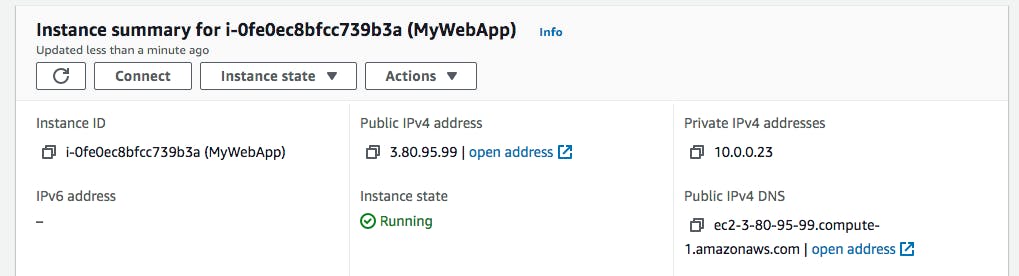
Once the stack is created successfully, we can access our application via the EC2 instance's Public IPv4 address or DNS. Here is an example of the public address in AWS console.
And here is how the deployed web site looks like:

Summary
We started with an architecture diagram and realised all the necessary resources of our infrastructure. Then defined the resources in a yaml file (template) and using a cloudformation stack, we created the resources in AWS environment and deployed the website. Although it may seem way too much work for just a simple web site like the example above, the concepts of IaC solve real world problems by enabling development teams to test applications in production-like environments, allowing to version control infrastructure source code and enabling faster product deployments.