IaC, Kubernetes, CI/CD - A complete setup guide


I recently did a DevOps bootcamp program called SheCodeAfrica - Cloud School. During the three month program I learned different cloud and DevOps technologies and tools. In my final project of the program, I used a django application and created a cloud infrastructure where the application will live on, deployed it on Kubernetes and finally created a continuous integration and deployment (CI/CD) pipeline to seamlessly streamline further updates of the application.
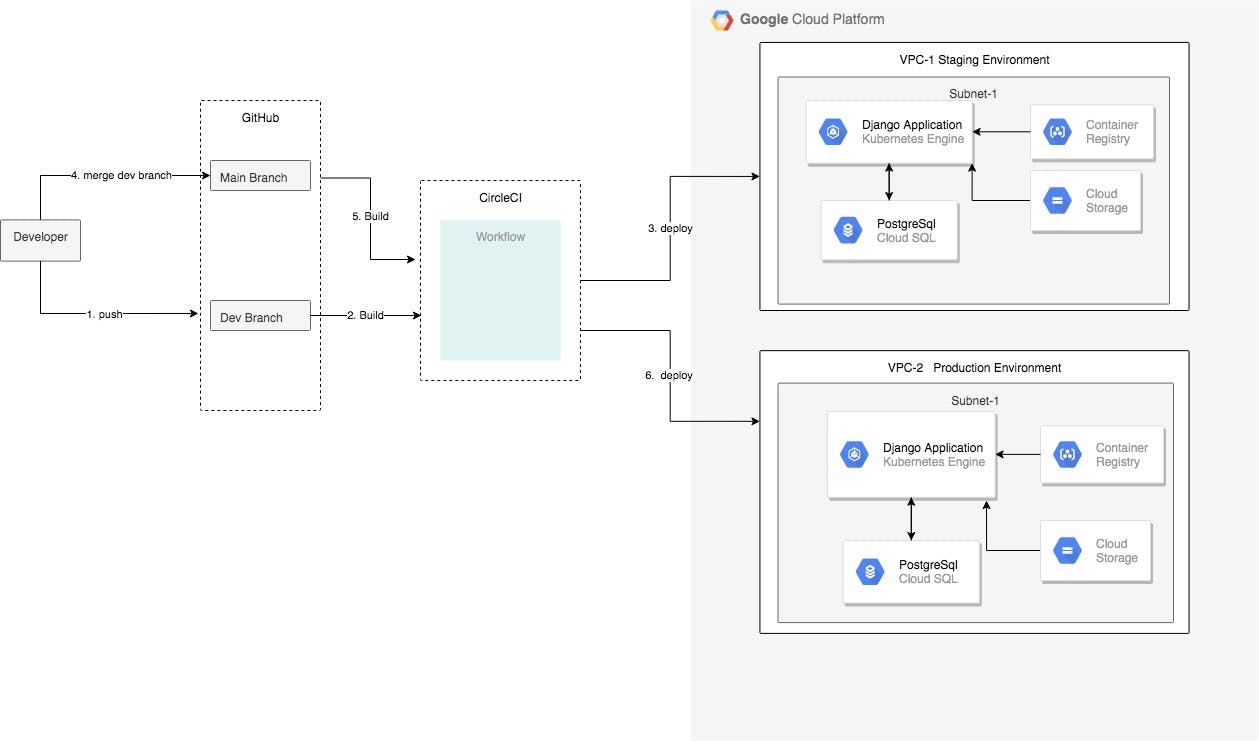
Here is the architecture diagram of the project, depicting the different components involved.
I am writing these series of articles to document the stuff I learned during the bootcamp and used in the project and also to help other developers get an understanding of IaC, Kubernetes and CI/CD through a step by step guide and code examples.
- Part 1: Infrastructure as a Code (IaC) - Terraform
- Part 2: Deployment using Kubernetes engine
- Part 3: A CI/CD pipeline - CircleCI
I will discuss Part 1 in this article. Part 2 and Part 3 will be published soon.
A detailed documentation on Part2 and Part 3 as well as the complete code can be found here : github.com/bezunesh/classified-ad
What is IaC
It is a technology that allows us to create and manage cloud resources such as networks, virtual machines (VM), storages, etc using a code. It enables automation and versioning of the procedures used to maintain an infrastructure. Unlike the usual way of creating resources such as a VM by clicking through some kind of Graphical User Interface (GUI), e.g. Google Cloud Platform, we create a configuration file, describing the kind of VM we would like to have, and use it to create the VM.
By maintaining the configuration file in a version control system such as GitHub, we can track the infrastructure's code version history, allowing team members to have a consistent development environment.
There are many tools used to achieve IaC such as Terraform, Puppet, Chef, Ansible, etc. In this article we will use Terraform.
Terraform
Hashicorp's Terraform is a tool that allows us to create, manage and provision cloud infrastructure using configuration files. One important aspect of it is that, the config files are written declaratively as opposed to imperative, meaning you define what you would like the infrastructure to look like, things like the type of VMs, SQL instances, network, storage etc. Terraform keeps the current state of the physical infrastructure that anytime you apply the config files, it compares the state with what is stated in the configuration file and if there is any difference, it will inform you and upon your approval, will create or remove resources so that that the state matches what is written in the config file.
When there are no differences this is what Terraform displays:
$ terraform plan
No changes. Infrastructure is up-to-date. This means that Terraform did not detect any differences between your configuration and real physical resources that exist. As a result, no actions need to be performed.
Let's get started working through an example and I will discuss the key concepts as we go along.
Prerequisites
- A Google Cloud Platform account. Sign up here
- A GCP project. Create one here
The following GCP APIs need to be enabled:
- Google Compute Engine. Enable it here
- Google Kubernetes Engine. Enable it here
- Cloud SQL API Admin. Enable it here
A GCP service account key. Create one here . In the settings, choose the role: Editor and Key type: JSON. For details on service accounts check: GCP service account
Terraform CLI installed. Follow installation guide here
The infrastructure
This is how infrastructure we are going to create will look like:
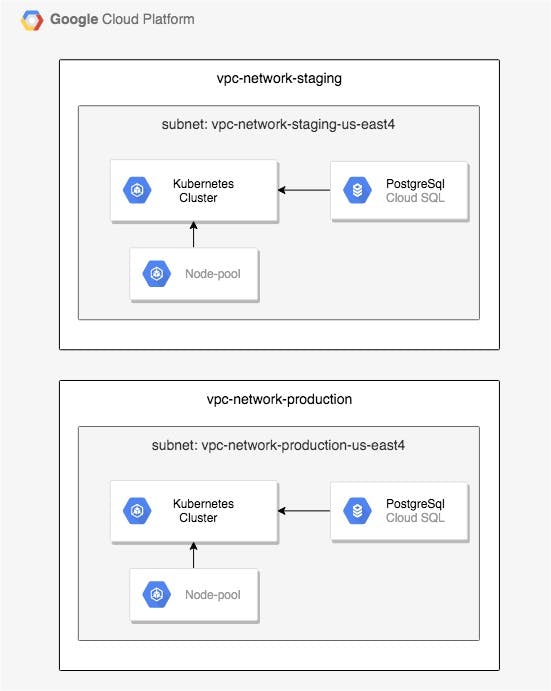
As shown above, we have a project that has two environments, staging and production. In each environment we have different resources: a virtual private network, a subnet, a kubernetes cluster, a cloud sql instance and a database.
Let us start to create the above resources by using Terraform code in a configuration file.
Step 1. Create terraform configuration files
Throughout the examples, we will use the following GCP project detail:
Project name: django-classified-adProject ID: django-classified-ad
Variables
Terraform variables provide flexibility and code reusability. We create variables.tf file and reference those variables in the main configuration file main.tf
As you follow along, you can add the code snippets in the relevant files accordingly or you can clone the GitHub repo from here
on your local computer:
cd iac-classified-ad
touch variables.tf
and add the following content to variables.tf
variable "project" {
    default = "django-classified-ad"
}
variable "credentials_file" { }
variable "environment" { }

variable "region" {
  default = "us-east4"
}

variable "zone" {
  default = "us-east4-a"
}

variable "subnet_region" {
  type        = string
  description = "GCP Region where first subnet will be created"
  default     = "us-east4"
}

variable "subnet_zone" {
  type        = string
  description = "GCP Zone within Subnet1 Region where GCE instance will be created"
  default     = "us-east4-a"
}

variable "subnet_cidr" {
  type        = string
  description = "VPC Network CIDR to be assigned to the VPC being created"
  default     = "192.168.6.0/24"
}

variable "db_username" {
  type        = string
  sensitive   = true
}

variable "db_password" {
  type        = string
  sensitive   = true
}
The main configuration file
Then we create the main configuration file main.tf, defining components such as providers and resources.
cd iac-classified-ad && touch main.tf
and define the provider
terraform {
  required_providers {
    google = {
      source = "hashicorp/google"
      version = "~> 3.5"
    }
  }
}

provider "google" {
  credentials = file(var.credentials_file)
  project = var.project
  region  = var.region
  zone    = var.zone
}
Terraform providers are plugins that are used to communicate with the service providers such as GCP, AWS, Azure, etc. In this case, we are going to create the resources on GCP, therefore we specify "google" as a provider. And we reference the variables defined above in the variables.tf file to set the provider's properties: credentials, project, region and zone.
Locals
define locals
locals {
  vpc_network_name = "vpc-network-${var.environment}"
}
Locals are variables which will be used in multiple places of the same file. Here we define the network name as a combination of the string vpc-network and a variable var.environment .Using the syntax ${ var.varialbeName }, we get the value of the variable defined in variables.tf.
Resources
Create a VPC network
resource "google_compute_network" "vpc_network" {
  name = local.vpc_network_name
  auto_create_subnetworks = false
}
We use google_compute_network to define a virtual private network. We specify the name as the value of the local variable created above and set the auto_create_subnetworks to false, as we don't want GCP to create automatic subnetworks.
When accessing variables defined using
locals, use the syntaxlocal.variableName. Notice the missings.
Create a subnet
resource "google_compute_subnetwork" "subnet" {
    name ="${local.vpc_network_name}-${var.subnet_region}"
    ip_cidr_range = var.subnet_cidr
    region = var.subnet_region
    network = google_compute_network.vpc_network.name
}
Using google_compute_subnetwork we define a subnetwork. And using the variables we defined, we set the name of the subnet, the ip-range and the region.
Create a firewall rule
resource "google_compute_firewall" "https" {
  name    = "${local.vpc_network_name}-allow-https"
  network = google_compute_network.vpc_network.name

  allow {
    protocol = "tcp"
    ports    = ["443"]
  }
  target_tags = ["web"]
}
Firewalls are created using the resource google_compute_firewall.Above we created a firewall rule that allows SSL connection via port 443.
Create a Kubernetes (GKE )cluster
resource "google_container_cluster" "primary" {
  name     = "cluster-${var.environment}"
  location = var.zone
  network  = google_compute_network.vpc_network.name
  subnetwork = google_compute_subnetwork.subnet.name

  remove_default_node_pool = true
  initial_node_count       = 1
}
google_container_cluster is used above to create a cluster. We set the name using a variable, whose value is set based on the environment we are in.
Create a node-pool
resource "google_container_node_pool" "nodes" {
  name       = "node-pool-${var.environment}"
  location   = var.zone
  cluster    = google_container_cluster.primary.name
  node_count = 1

  node_config {
    machine_type = "e2-medium"
    oauth_scopes = [
      "https://www.googleapis.com/auth/cloud-platform"
    ]
  }
}
Above we create a node-pool (managed VMs). We set the name according to the environment. The oauth_scopes setting grants access to relevant APIs, and in this case it grants access to all APIs.
Create cloud sql instance and a database
resource "google_sql_database_instance" "instance" {
  name             = "postgres-instance-${var.environment}"
  database_version = "POSTGRES_13"
  region           = var.region

  settings {
    tier = "db-f1-micro"
  }
  deletion_protection = "false"
}

resource "google_sql_database" "database" {
  name     = "polls"
  instance = google_sql_database_instance.instance.name
}

resource "google_sql_user" "users" {
  name     = var.db_username
  instance = google_sql_database_instance.instance.name
  password = var.db_password
}
We use google_sql_database_instance to create a cloud SQL instance. In this case, a PostgreSQL instance. Then we create a database: classified-ad using google_sql_database. And create a user using
google_sql_user.
Step 2 - Prepare two environments: staging and production
cd iac-classified-ad
mkdir -p environment/staging
mkdir -p environment/production

# create a symlink to the main.tf  and variables.tf file from the staging directory
cd environment/staging
ln -s ../../main.tf main.tf
ln -s ../../variables.tf variables.tf

# create a symlink to the main.tf  and variables.tf file from the production directory
cd environment/production
ln -s ../../main.tf main.tf
ln -s ../../variables.tf variables.tf
Define variables for the staging environment
cd iac-classified-ad/environment/staging
touch terraform.tfvars
add these variables to the file : environments/staging/terraform.tfvars
environment = "staging"
credentials_file = "[path-to-service-account-private-key-file]"
db_username = "[db-user-name]"
db_password = "[db-password]"
Define variables for the production environment
cd iac-classified-ad/environment/production
touch terraform.tfvars
add these variables to the file : environments/production/terraform.tfvars
environment = "production"
credentials_file = "[path-to-service-account-private-key-file]"
db_username = "[db-user-name]"
db_password = "[db-password]"
Step 3- initialise Terraform - Staging
cd iac-classified-ad/environment/staging
terraform init
Step 4- Apply the configuration - create the physical infrastructure - Staging
cd iac-classified-ad/environment/staging
terraform apply
If there are no config errors, terraform will display the changes that is about to happen and will ask for a confirmation, check the values and reply with a 'yes' to continue with the creation process.
To create the production infrastructure, change the directory to environment/production and perform step 3 and 4
Summary
In this article, we started with the architecture diagram of the infrastructure we would like to have, created terraform configuration files variables.tf and main.tf, we then created two environments: staging and production, setup the variables for each environment accordingly inside terraform.tfvars, initialised terraform and finally applied the configurations that will create the physical infrastructure.
In the next article, I will discuss how we can deploy a django application using GKE on the infrastructure we created in this article.